When dealing with a system crash due to a kernel panic, it is crucial to leave the “panic” to the kernel and focus on troubleshooting in a calm, structured way. This approach will help you get things running smoothly in less time and minimize stress and headaches in the process.
We’ll share exactly how to best approach a kernel panic after a quick refresher on what it is and the top causes of the scenario.
What is a Kernel Panic?
A kernel panic happens when your kernel encounters something it can’t handle, causing it to crash and lose any unsaved files or ongoing projects. Kernel panics always have a reason for taking place, even if it isn’t immediately obvious. Below are some main causes:
File System Problems
If you have a corrupted initrd file or are having issues with your file server, a kernel panic can happen to prevent the root file system from being dismounted.
File System Location Problems
If your root filesystem has changed locations recently, the initrd (or initramfs) file may be unable to locate them, creating a knock-on effect that results in a kernel panic.
Initrd File Updates (Or Lack Thereof)
You may have recently installed security patching or kernel modules. Even if the initrd file installation process was seamless, if it has not been updated accordingly, it can still lead to kernel panics.
Kernel Module Incompatibility
Assuming your initrd file is fully up-to-date, kernel modules or patching in cyber security can continue to lead to kernel panics if the modules/patches have any issues with your computer system itself.
How Can I Identify a Kernel Panic?
This should always be your first step if you’ve experienced what appears to be a system crash on your Linux device. Once you’re sure you’re dealing with a kernel panic, you can troubleshoot as per the steps set out below.
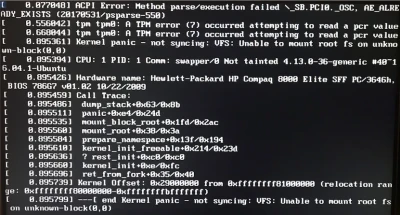
Kernel panics will always be indicated directly in the error screen text. Below is an example; towards the bottom of the image, you’ll see the words ‘Kernel panic’ written out.

Now that we’ve covered the basics of kernel panics, their causes, and their identifying feature, it’s time to walk through the best troubleshooting options available in order.
Step 1: Restart Your Device
We’ve all heard of the tried and true method of “turning it off and back on again.” It might sound too obvious to be worth trying, but restarting the device experiencing the panic is often the quickest and easiest way to address the issue.
What this does, in practice, is root out the possibility that your kernel panic was a one-off occurrence that your system was able to either fix or avoid on its own. If your problem doesn’t recur, you’ll be free to investigate and determine whether you need to address the underlying problem.
If you continue to be plagued by the same error screen after a reboot, you must try the following measures first.
Step 2: Boot With an Old Kernel
Since kernel modules are one of the main reasons the panics happen, it’s a good idea to try running your device using an old one. This lets you determine whether it’s the kernel version that’s causing the kernel panic or not.
If you do find that your newer kernel is causing problems, it’s a good idea to uninstall it and then attempt a fresh install. As you’re re-installing, make sure you’re closely following instructions.
Step 3: Check Your Hardware
At times, your device will be working just fine, and the problem will come from a piece of hardware that didn’t come with it. Here are three you should always check in the event of a kernel panic.
RAM
Have you added any extra RAM to your computer through an upgrade? If so, it could be causing incompatibility errors, leading to kernel panic.
First, ensure your bonus RAM is properly seated within your device. If this doesn’t fix the problem, try removing the RAM and rebooting, as this could mean the RAM itself has a problem and needs to be repaired or replaced by the manufacturer.
USB Devices
From flash drives to printers, any pieces of external hardware that you connect using a USB port can cause problems and lead to a kernel panic. Unplug them all, reboot your device, and see if the problem persists.
If it doesn’t, you’ll want to examine your piece of hardware for any faults or other issues that could contribute to the kernel panic. It’s a good idea to insert them into another device, if possible.
Once you’ve ruled out (or identified) your USB devices as a problem, you can reconnect them (or repair them).
Disks
Your disk might be the problem. To combat this, try running your Linux device’s built-in disk repair function, which may find and fix the root of the issue.
If running the repair function doesn’t change anything about the kernel panic, you can assume it’s not the culprit.
Step 4: Check Your Software
Your hardware is clear—but what about your software? The following items are important to investigate to determine whether they’ve got a hand in your kernel panic.
New Installs
Brand-new software may not have been installed correctly. Alternatively, the software might have some compatibility issues with your hardware, which can bring about a kernel meltdown.
Uninstall any programs or apps you’ve added recently, one at a time.
Updates
If you aren’t completely sure that all of your software is entirely up to date, it’s a good idea to double-check. You may find that a piece of software is not as scalable as you thought, which can create problems when it’s used for scaling that it was not designed for.
Software That Boots Up Automatically
Maybe you prefer to be available to your remote contacts whenever you use your computer, so you’ve set Skype (or a similar tool) to auto-boot when your device starts. However, this can sometimes contribute to kernel panics.
Disable your auto-boot programs individually to check if they’re causing the panic.
Step 5: Consult Your Crash Reports
These reports give you as much information as possible about the origins of a crash, including one caused by a kernel panic.
Your most recent crash report(s) may contain valuable information you can use to understand what caused your kernel panic. If it’s related to something in previous steps, you can rest assured that the issue has been addressed. Otherwise, it may be time to make some more changes.
Step 6: Update Your Operating System
Like others, Linux always improves as an operating system and evolves with each consecutive update. That’s why ensuring you’re running the newest possible version of your OS is well worth it.
Step 7: Turn to System Restore
This handy network security toolkit is easy to overlook but can be precisely what you need when struggling with kernel panics. Simply revert your device to when you were not experiencing the problem. You can then work backward and figure out exactly what changed between the version of your device that did not run into kernel panics and the one that did. For example, you might find that you’ve been targeted by malware, creating more problems beyond the initial attack.
And as a Last Resort…
 It’s always worth seeing whether anyone has posted online about a similar problem. Browsing online forums can yield great results, especially if your computer model has been on the market for at least a few months. Reddit, Linux Questions, and Linux.org are some popular forums.
Plus, you can always search forums outside of your own country. For example, you can look for forums with domain NZ, KR, SE, or any other country in which your device has at least some popularity. These might not appear automatically on a search engine like Google and could hold your solution.
Doing this type of forum research before investing in a new piece of hardware is also generally a good idea, as it sets up your expectations for the device beforehand.
Final Thoughts on Identifying & Troubleshooting a Kernel Panic
Encountering a kernel panic is always a pain, especially when you can’t remember the last time you saved your work. However, taking the time to troubleshoot one step at a time is crucial despite this, as it’s the best way to prevent future kernel panics.
By following our guide, you can figure out what happened to your kernel and make sure the problem won’t recur.
This will keep you and your work safe and make for a less frustrating experience for you and your users.


